23-图编排引擎:LangGraph和多Agent架构
前言
复杂的 Agent 产品基本都是多 Agent 架构。
为什么呢?
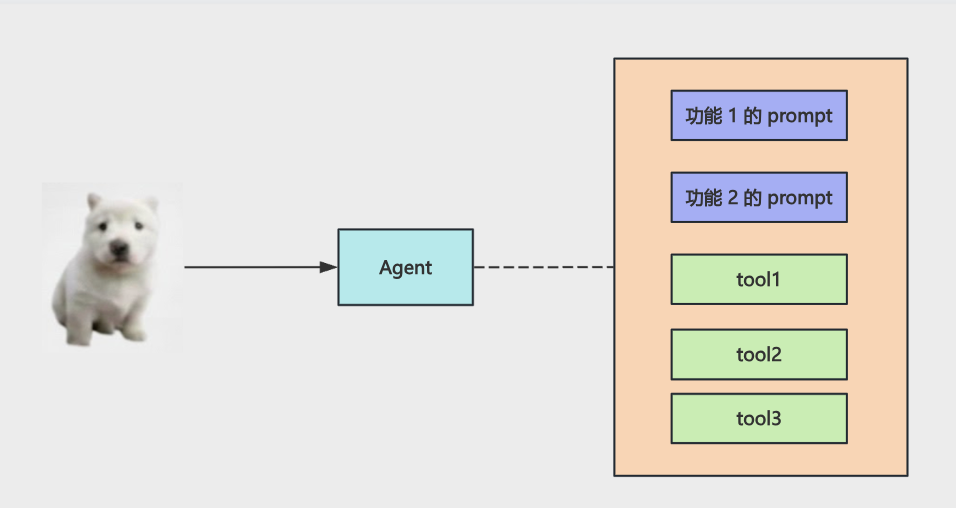
单 Agent 架构下,所有 tool 的描述、每个功能的 prompt 都放到 system prompt 里。
实际上执行每个功能只需要其中一部分 prompt,但每次都全带上。
这样会导致 token 消耗更高,更重要的是很多无关信息干扰,思考效率低还更容易出错。
而如果你拆分成多个 Agent 呢?
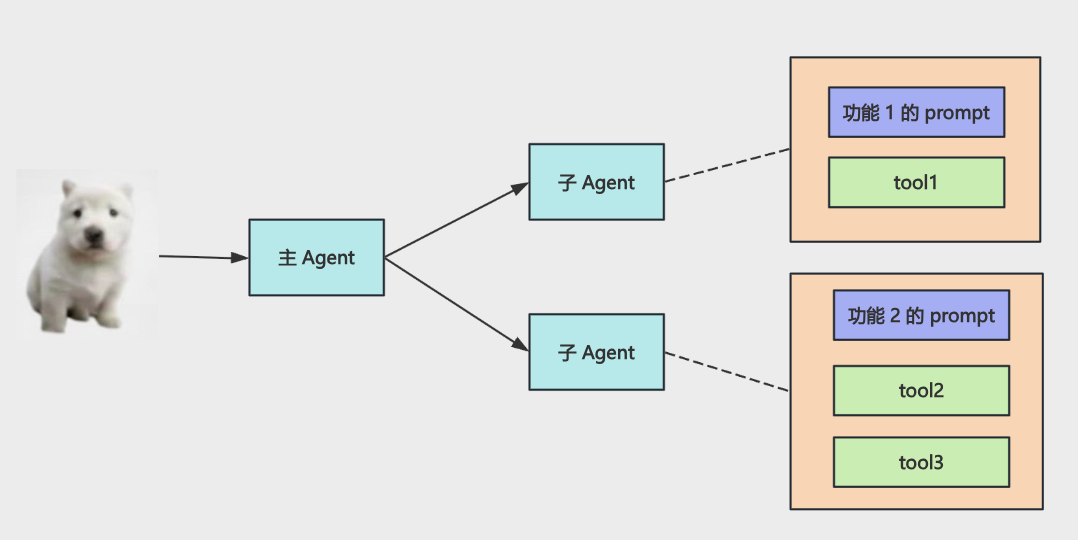
每个 Agent 只保留需要的 prompt,执行功能的时候,消耗的 token 更少,没有无关信息干扰,准确率也更高。
再就是单 Agent 只有一个大脑,需要一步步思考,调用 tool
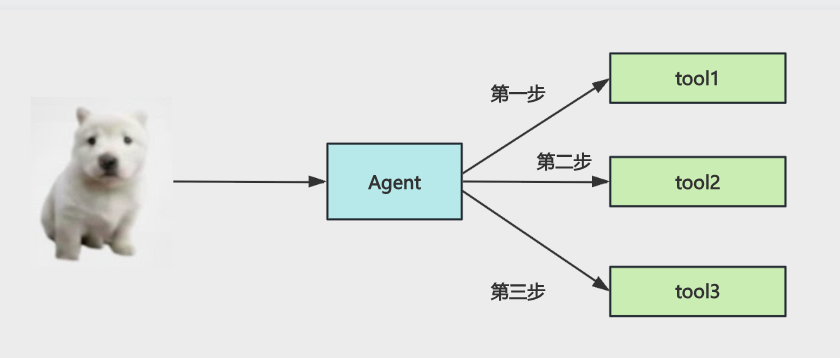
而多 Agent 的多个大脑当然是可以并行思考的,主 Agent 下发任务,子 Agent 并行处理完成后返回
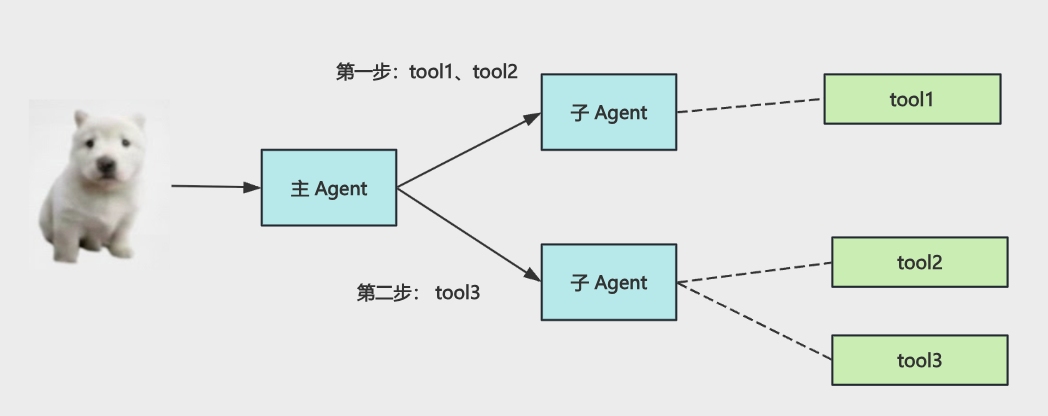
还有,单 Agent 虽然可以加上反思阶段,但相当于自己给自己纠错
而多 Agent 每个都是不同的角色,可以互相讨论纠错
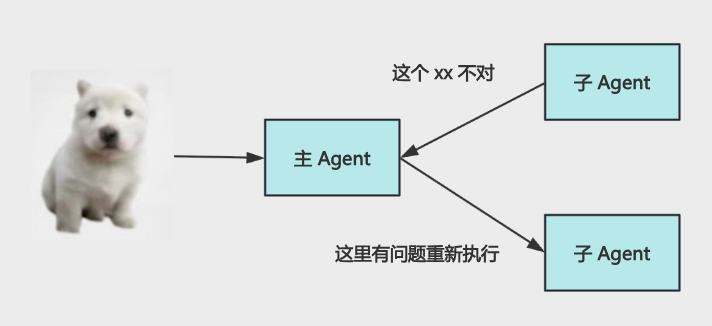
基于这三个原因:
- 决策准确率更高、token 消耗更低:每个 Agent 只带必要的最少prompt,没有冗余信息干扰,虽然调用 LLM 次数多了,但更省 token、决策更准、更稳定
- 并行思考和任务处理:主管分派任务,子 Agent 并行处理,整体效率更高
- 多角色互相讨论,纠错能力更强:多 Agent 有不同角色,可以互相监督、互相纠错,比单个 Agent 自己反思更靠谱,复杂任务表现更强
什么是LangGraph
现在复杂 Agent 产品基本都是多 Agent 架构的。
实现 Multi Agent 就需要学习 LangGraph 了。
用到的 api 还是 LangChain 那些,但它多了一套图编排引擎。
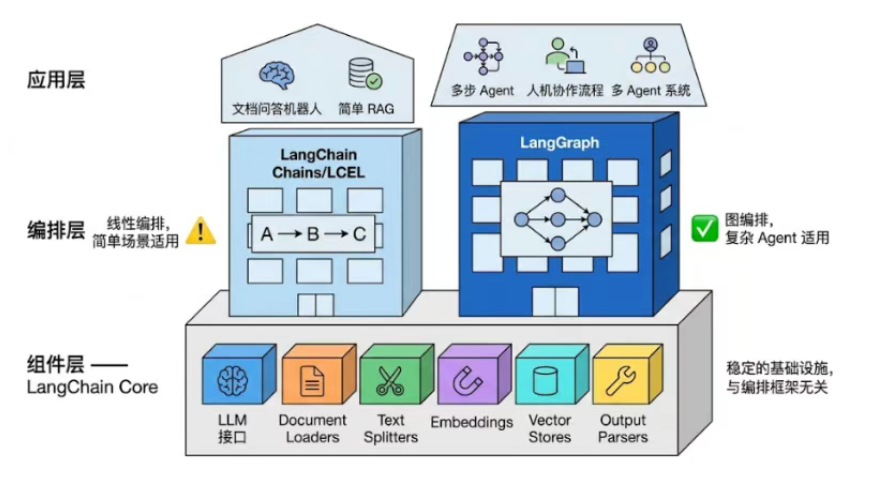
我们学了 LangChain 的组件,学了 LCEL 的线性编排,今天来学一下 LangGraph 的图编排引擎。
我们直接通过代码来学一下
基础
创建 src/basic-graph.mjs
import { Annotation, END, START, StateGraph } from "@langchain/langgraph";

// 定义图中所有节点共享的状态字段。
const StateAnnotation = Annotation.Root({
  text: Annotation({
    reducer: (_prev, next) => next, // 当节点返回新的 text 时,如何把新值和旧值合并。
    default: () => "", // 初始值。
  }),
});

// 每个节点接收当前状态,并只返回自己要更新的字段。
const step1 = (state) => ({ text: `${state.text} -> step1` });
const step2 = (state) => ({ text: `${state.text} -> step2` });

// 创建线性工作流:START -> step1 -> step2 -> END。
const graph = new StateGraph(StateAnnotation)
  .addNode("step1", step1) // 节点名称: step1,节点函数: step1。
  .addNode("step2", step2) // 节点名称: step2,节点函数: step2。
  .addEdge(START, "step1") // 起点: START,终点: step1。
  .addEdge("step1", "step2") // 起点: step1,终点: step2。
  .addEdge("step2", END) // 起点: step2,终点: END。
  .compile(); // 编译图,生成可执行的函数。

// 导出为 Mermaid:可复制到 https://mermaid.live 或 Markdown 的 ```mermaid 代码块
// 获取的是当前工作流的图结构
const drawable = await graph.getGraphAsync();
// 将图结构转换为 Mermaid 格式
const mermaid = drawable.drawMermaid({ withStyles: true });
console.log(mermaid);

// 使用初始状态执行整个工作流。
const result = await graph.invoke({ text: "hello" });
console.log("result:", result);
创建 StateGraph 图
添加两个节点(node),加上固定的 START、END 节点
然后用边(edge)连起来
编译后执行,将mermaid的数据复制到https://mermaid.live里或Markdown 的 ```mermaid 代码块
Annotation 用于创建 State,指定默认值(default)和合并逻辑(reducer)
这样我们基于 LangGraph 的第一个图就完成了。
图中当然有分支和循环。
分支
src/conditional-routing.mjs
import { Annotation, END, START, StateGraph } from "@langchain/langgraph";

const StateAnnotation = Annotation.Root({
  query: Annotation({
    reducer: (_prev, next) => next,
    default: () => "",
  }),
  route: Annotation({
    reducer: (_prev, next) => next,
    default: () => "chat",
  }),
  answer: Annotation({
    reducer: (_prev, next) => next,
    default: () => "",
  }),
});

const router = (state) => {
  const isMath = /[+\-*/]/.test(state.query);
  return { route: isMath ? "math" : "chat" };
};

const mathNode = (state) => {
  try {
    return { answer: String(eval(state.query)) };
  } catch {
    return { answer: "表达式无法计算" };
  }
};

const chatNode = (state) => ({ answer: `你说的是:${state.query}` });

const graph = new StateGraph(StateAnnotation)
  .addNode("router", router)
  .addNode("math", mathNode)
  .addNode("chat", chatNode)
  .addEdge(START, "router")
  .addConditionalEdges("router", (state) => state.route, {
    math: "math",
    chat: "chat",
  })
  .addEdge("math", END)
  .addEdge("chat", END)
  .compile();

// 导出为 Mermaid:可复制到 https://mermaid.live 或 Markdown 的 ```mermaid 代码块
const drawable = await graph.getGraphAsync();
const mermaid = drawable.drawMermaid({ withStyles: true });
console.log(mermaid);

console.log("result:", await graph.invoke({ query: "你好" }));

console.log("result:", await graph.invoke({ query: "10 * 8" }));
用 addConditionalEdges 添加分支
判断文本如果有+-*/字符就走 math 分支,否则走 chat 分支
循环
其实它也是用分支来实现
src/loop-retry.mjs
import { Annotation, END, START, StateGraph } from "@langchain/langgraph";

const StateAnnotation = Annotation.Root({
  tries: Annotation({
    reducer: (_prev, next) => next,
    default: () => 0,
  }),
  ok: Annotation({
    reducer: (_prev, next) => next,
    default: () => false,
  }),
  message: Annotation({
    reducer: (_prev, next) => next,
    default: () => "",
  }),
});

const attempt = (state) => {
  const tries = state.tries + 1;
  const ok = tries >= 3;
  return {
    tries,
    ok,
    message: ok ? `第 ${tries} 次成功` : `第 ${tries} 次失败,继续重试`,
  };
};

const graph = new StateGraph(StateAnnotation)
  .addNode("attempt", attempt)
  .addEdge(START, "attempt")
  .addConditionalEdges("attempt", (state) => (state.ok ? "done" : "retry"), {
    retry: "attempt",
    done: END,
  })
  .compile();

// 导出为 Mermaid:可复制到 https://mermaid.live 或 Markdown 的 ```mermaid 代码块
const drawable = await graph.getGraphAsync();
const mermaid = drawable.drawMermaid({ withStyles: true });
console.log(mermaid);

const result = await graph.invoke({ tries: 0 });
console.log("result:", result);
同样用 addConditionalEdges 判断条件满足就到 END 节点,否则重新路由到之前的节点
这样就可以实现循环效果
保存状态
经过这几个例子,应该能看出节点之间是怎么通信的:通过 state
那把 state 保存下来不就是把当前图的执行状态保存下来了么?
这个通过 ChekpointerSaver 的 api 就可以保存
创建 src/checkpointer-memory.mjs
import {
  Annotation,
  END,
  MemorySaver,
  START,
  StateGraph,
} from "@langchain/langgraph";

const StateAnnotation = Annotation.Root({
  visitCount: Annotation({
    reducer: (_prev, next) => next,
    default: () => 0,
  }),
  message: Annotation({
    reducer: (_prev, next) => next,
    default: () => "",
  }),
});

/** 每跑一轮图,给「当前会话」访问次数 +1 */
function recordVisit(state) {
  const visitCount = state.visitCount + 1;
  const message =
    visitCount === 1
      ? "这是你在本会话里第 1 次进入。"
      : `这是你在本会话里第 ${visitCount} 次进入`;
  return { visitCount, message };
}

const graph = new StateGraph(StateAnnotation)
  .addNode("recordVisit", recordVisit)
  .addEdge(START, "recordVisit")
  .addEdge("recordVisit", END);

const checkpointer = new MemorySaver();
const app = graph.compile({ checkpointer });

const user1 = { configurable: { thread_id: "用户-小张" } };
const user2 = { configurable: { thread_id: "用户-小李" } };

const res1 = await app.invoke({}, user1);
const res2 = await app.invoke({}, user1);
const res3 = await app.invoke({}, user1);
const res4 = await app.invoke({}, user2);

console.log(res1);
console.log(res2);
console.log(res3);
console.log(res4);
我们用 MemorySaver 来把 state 保存到内存里,这样下次就会基于上次的 state 继续执行
当然,还可以保存到 sqlite、redis 等,分别用 SqliteSave、RedisSaver 等 api
打断功能
我们用 cursor 之类的 coding agent,它经常会让你确认,确认后再继续执行,这种打断功能咋做呢?
LangGraph 提供了 interrupt 的 api
创建 src/graph-interrupt.mjs
import { createInterface } from "node:readline/promises";
import {
  Annotation,
  Command,
  END,
  MemorySaver,
  START,
  StateGraph,
  interrupt,
} from "@langchain/langgraph";

const StateAnnotation = Annotation.Root({
  actionSummary: Annotation({
    reducer: (_prev, next) => next,
    default: () => "",
  }),
  userInput: Annotation({
    reducer: (_prev, next) => next,
    default: () => "",
  }),
});

/** 展示一笔待确认的转账 */
const showTransfer = () => ({
  actionSummary: "向张三转账 ¥100(模拟,不会真扣款)",
});

/** 停在这里等人输入;resume 的值会写进 userInput */
const waitConfirm = (state) => {
  const text = interrupt({
    hint: "终端里输入「确认」或备注后回车,图才会继续",
    actionSummary: state.actionSummary,
  });
  return { userInput: String(text) };
};

const graph = new StateGraph(StateAnnotation)
  .addNode("showTransfer", showTransfer)
  .addNode("waitConfirm", waitConfirm)
  .addEdge(START, "showTransfer")
  .addEdge("showTransfer", "waitConfirm")
  .addEdge("waitConfirm", END)
  .compile({ checkpointer: new MemorySaver() });

// 导出为 Mermaid:可复制到 https://mermaid.live 或 Markdown 的 ```mermaid 代码块
const drawable = await graph.getGraphAsync();
const mermaid = drawable.drawMermaid({ withStyles: true });
console.log(mermaid);

const config = { configurable: { thread_id: "interrupt-demo" } };

const paused = await graph.invoke({}, config);
console.log("\n待你确认:", paused.__interrupt__?.[0]?.value);

const rl = createInterface({ input: process.stdin, output: process.stdout });
const line = (await rl.question("> ")).trim();
await rl.close();

if (!line) {
  console.error("未输入,退出。");
  process.exit(1);
}

const done = await graph.invoke(new Command({ resume: line }), config);
console.log("结果:", done);
用 interrupt 中断图的执行
等待用户输入之后再次 invoke,传入 new Command({resume: 'xxx'})
这样图就会在上次断点位置继续执行
这里用了 nodejs 的 readline 包读取键盘输入
这样就可以实现图的中断、恢复了。
LangGraph 实现工具调用 Agent
LangGraph 实现工具调用 Agent 有两种写法:
- 底层原生写法:手动搭建 StateGraph,使用官方预制节点
ToolNode、判断函数toolsCondition - 高层封装写法:
createAgent快捷 API,内部自动封装上面整套图逻辑
写法 1:底层手动构建图
比如我们要调用 tool,用 graph 的写法怎么写呢?
创建 model 的节点,创建 tool 的节点
然后加一个 conditional 节点,判断如果有 tool call 就走 tool 节点,否则走 END
但不用自己写,langgraph 内置了 ToolNode 和 toolsCondition 的 api
用到的 inventory-mock.mjs
/** 假数据,模拟「按 SKU 查库存」接口 */
const rows = [
  { sku: "SKU-001", name: "无线鼠标", stock: 42 },
  { sku: "SKU-002", name: "机械键盘", stock: 7 },
  { sku: "SKU-003", name: "USB-C 线缆", stock: 120 },
];

export function getProductBySku(sku) {
  const key = String(sku).trim().toUpperCase();
  const row = rows.find((r) => r.sku.toUpperCase() === key);
  if (!row) return JSON.stringify({ found: false, sku: String(sku).trim() });
  return JSON.stringify({ found: true, ...row });
}
src/prebuilt-tool-node.mjs
import "dotenv/config";

import { HumanMessage } from "@langchain/core/messages";
import { tool } from "@langchain/core/tools";
import {
  END,
  MessagesAnnotation,
  START,
  StateGraph,
} from "@langchain/langgraph";
import { ToolNode, toolsCondition } from "@langchain/langgraph/prebuilt";
import { ChatOpenAI } from "@langchain/openai";
import { z } from "zod";
import { getProductBySku } from "./inventory-mock.mjs";

const getProductStock = tool(async ({ sku }) => getProductBySku(sku), {
  name: "get_product_stock",
  description: "按 SKU 查商品名与库存,SKU 如 SKU-001。",
  schema: z.object({
    sku: z.string().describe("商品 SKU"),
  }),
});

const tools = [getProductStock];
const llm = new ChatOpenAI({
  modelName: process.env.MODEL_NAME,
  apiKey: process.env.OPENAI_API_KEY,
  configuration: {
    baseURL: process.env.OPENAI_BASE_URL,
  },
}).bindTools(tools);

async function agent(state) {
  const response = await llm.invoke(state.messages);
  return { messages: response };
}

const toolNode = new ToolNode(tools);

const graph = new StateGraph(MessagesAnnotation)
  .addNode("agent", agent)
  .addNode("tools", toolNode)
  .addEdge(START, "agent")
  .addConditionalEdges("agent", toolsCondition, ["tools", END])
  .addEdge("tools", "agent")
  .compile();

const result = await graph.invoke({
  messages: [
    new HumanMessage("查一下 SKU-001 的库存还有多少,回答里带上商品名和数字。"),
  ],
});

// 导出为 Mermaid:可复制到 https://mermaid.live 或 Markdown 的 ```mermaid 代码块
const drawable = await graph.getGraphAsync();
const mermaid = drawable.drawMermaid({ withStyles: true });
console.log(mermaid);

const last = result.messages.at(-1);
console.log(last?.content ?? result.messages);
写法 2:高层封装
当然,像这么常用的 agent loop 自然也给封装好了,就是 createAgent 的 api:
prebuilt-agent.mjs
import "dotenv/config";

import { HumanMessage } from "@langchain/core/messages";
import { ChatOpenAI } from "@langchain/openai";
import { MemorySaver } from "@langchain/langgraph";
import { createAgent, tool } from "langchain";
import { z } from "zod";

import { getProductBySku } from "./inventory-mock.mjs";

const getProductStock = tool(async ({ sku }) => getProductBySku(sku), {
  name: "get_product_stock",
  description: "按 SKU 查商品名与库存,SKU 如 SKU-001。",
  schema: z.object({
    sku: z.string().describe("商品 SKU"),
  }),
});

const model = new ChatOpenAI({
  modelName: process.env.MODEL_NAME,
  apiKey: process.env.OPENAI_API_KEY,
  configuration: {
    baseURL: process.env.OPENAI_BASE_URL,
  },
});

const agent = createAgent({
  model,
  tools: [getProductStock],
  systemPrompt:
    "你是仓库助手。问库存时必须调用 get_product_stock(模拟数据),禁止编造。",
  checkpointer: new MemorySaver(),
});

const result = await agent.invoke(
  { messages: [new HumanMessage("SKU-002 还剩多少库存?")] },
  { configurable: { thread_id: "demo-thread" } },
);

// 导出为 Mermaid:可复制到 https://mermaid.live 或 Markdown 的 ```mermaid 代码块
const drawable = await agent.graph.getGraphAsync();
const mermaid = drawable.drawMermaid({ withStyles: true });
console.log(mermaid);

const last = result.messages.at(-1);
console.log(last?.content ?? result);
直接用 createAgent 来跑 agent loop
看一下它的图:
和刚才写的一样,这个 api 内部就是基于 LangGraph 构建的 agent loop 的图。
学完 LangGraph 的图,我们来写一个多 Agent 的架构
createAgent的逻辑就等同于
START
  ↓
agent(LLM)
  ↓
判断有没有 tool call
  ├── 没有 → END
  │
  └── 有 → tools(执行工具)
              ↓
           agent(LLM)
              ↓
         判断有没有 tool call
              ...
如果我改成
START
  ↓
agent(LLM)
  ↓
判断有没有 tool call
  ├── 没有 → 执行其他逻辑 → END
  │
  └── 有 → tools(执行工具)
              ↓
           agent(LLM)
              ↓
         判断有没有 tool call
              ...
那直接用 StateGraph 更灵活。
“主管 - 工人”模式
多 Agent 最常用的是 Supervisor - Worker 模式,也就是“主管 - 工人”模式
langchain 提供了这种多 Agent 架构的包 @langchain/langgraph-supervisor
安装下:pnpm install @langchain/langgraph-supervisor
创建 multi-agent-supervisor.mjs
import "dotenv/config";

import { HumanMessage } from "@langchain/core/messages";
import { createSupervisor } from "@langchain/langgraph-supervisor";
import { ChatOpenAI } from "@langchain/openai";
import { createAgent, tool } from "langchain";
import { z } from "zod";

import { lookupCityTrivia, lookupWeather } from "./simple-mock.mjs";

const model = new ChatOpenAI({
  modelName: process.env.MODEL_NAME,
  apiKey: process.env.OPENAI_API_KEY,
  configuration: {
    baseURL: process.env.OPENAI_BASE_URL,
  },
});

const lookupWeatherTool = tool(async ({ city }) => lookupWeather(city), {
  name: "lookup_weather",
  description: "查询某城市当日天气概况(气温区间、天气、空气质量等)。",
  schema: z.object({
    city: z.string().describe("城市名,如 杭州"),
  }),
});

const lookupCityTriviaTool = tool(async ({ city }) => lookupCityTrivia(city), {
  name: "lookup_city_trivia",
  description: "查询与某城市相关的一句趣味知识。",
  schema: z.object({
    city: z.string().describe("城市名,如 杭州"),
  }),
});

/** 子代理 A:只回答「天气」类问题 */
const weatherAgent = createAgent({
  name: "weather_agent",
  description: "专门查天气",
  model,
  tools: [lookupWeatherTool],
  systemPrompt:
    "你只处理天气。用户提到城市时,用 lookup_weather 查询后再用中文简短说明。",
});

/** 子代理 B:只回答「城市小知识」 */
const triviaAgent = createAgent({
  name: "trivia_agent",
  description: "专门讲与城市相关的小知识;必须调用 lookup_city_trivia。",
  model,
  tools: [lookupCityTriviaTool],
  systemPrompt:
    "你只讲城市小知识。先 lookup_city_trivia,再用人话转述,不要编造工具里没有的内容。",
});

/**
 * Supervisor:根据用户问的是「天气」还是「小知识」切换子代理。
 * (真实业务里还可以再加更多子代理,思路一样。)
 */
const workflow = createSupervisor({
  agents: [weatherAgent.graph, triviaAgent.graph],
  llm: model,
  prompt: `你是调度员,只负责选人,不要自己报气温、也不要自己讲城市百科。

- 问天气、气温、下不下雨、空气 → 用 weather_agent
- 问小知识、名胜、历史、一句介绍 → 用 trivia_agent
`,
});

const app = workflow.compile();

const drawable = await app.getGraphAsync();
console.log(drawable.drawMermaid({ withStyles: true }));

const input = {
  messages: [
    new HumanMessage("查一下杭州的天气,再讲一条和杭州有关的小知识。"),
  ],
};

const nodePath = [];
let finalState = null;
const stream = await app.stream(input, { streamMode: ["updates", "values"] });
for await (const event of stream) {
  const [mode, payload] = event;
  if (mode === "updates" && payload && typeof payload === "object") {
    nodePath.push(...Object.keys(payload));
  } else if (mode === "values") {
    finalState = payload;
  }
}

console.log("路径:", nodePath.join(" → "));
const last = finalState?.messages?.at(-1);
console.log(last?.content ?? finalState?.messages);
我们用 createAgent 创建了 2 个 子 Agent
然后用 createSupervisor 创建主管 Agent:

子 Agent 一个查天气,一个查城市历史
用 stream 可以拿到整个图运行过程的状态
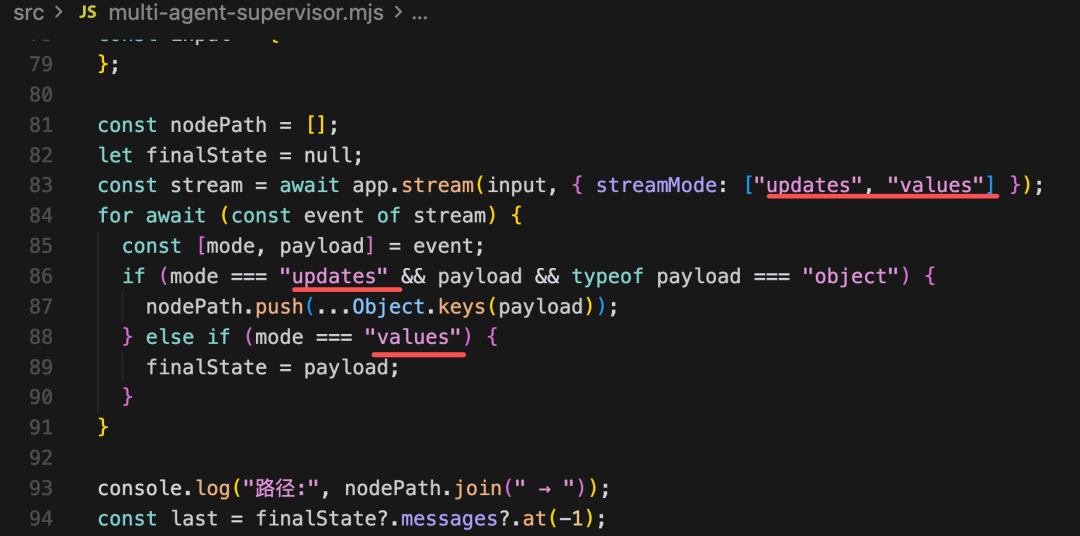
它的 state 内容挺多的,所以支持几种模式
updates 是增量模式,就是过滤出这个节点增量修改的 state 来
values 是全量模式,给你所有的 state
我们这里用 updates 模式拿到经过的节点的名字
最后的回复用 values 模式拿
用到查询代码的实现simple-mock.mjs:
/** 假接口:演示 supervisor 如何把问题分给不同子代理 */

function normCity(city) {
  return String(city).trim();
}

const weatherTable = {
  杭州: { summary: "多云转小雨", tempHighC: 22, tempLowC: 15, aqi: "良" },
  北京: { summary: "晴", tempHighC: 26, tempLowC: 12, aqi: "轻度污染" },
  上海: { summary: "阴", tempHighC: 20, tempLowC: 16, aqi: "良" },
};

const triviaTable = {
  杭州: "西湖文化景观是世界文化遗产之一。",
  北京: "故宫是世界上现存规模最大的古代宫殿建筑群之一。",
  上海: "外滩万国建筑博览群是近代城市历史的缩影。",
};

/** 查某地当日天气摘要(模拟) */
export function lookupWeather(city) {
  const c = normCity(city);
  const w = weatherTable[c];
  if (!w) {
    return JSON.stringify({
      city: c,
      summary: "暂无该城市数据,以下为占位",
      tempHighC: 20,
      tempLowC: 12,
      aqi: "—",
    });
  }
  return JSON.stringify({ city: c, ...w });
}

/** 查与某城市相关的一句小知识(模拟) */
export function lookupCityTrivia(city) {
  const c = normCity(city);
  const line = triviaTable[c];
  return JSON.stringify({
    city: c,
    trivia: line ?? `没有为「${c}」准备内置小知识,可换杭州/北京/上海试试。`,
  });
}
这样,我们第一个多 Agent 的代码就跑通了。
虽然用 stream 的 values 模式可以打印 state,但是它内容太多了。
如果想看一下执行过程,最好的方式是断点调试。
通过调试,就可以清晰的看到整个 graph 的流转过程。
也可以看到 @langchain/langgraph-supervisor 的多 Agent 架构的实现原理,就是在 state 里保存了 messages 数组来传递信息
回头看下这张图:
总结
这节我们学了 LangGraph 和多 Agent 架构。
我们理清了 3 个用多 Agent 架构的理由:
- prompt 拆分到多个 Agent 中去,更纯净,token 消耗少,不容易决策出错
- 多个 Agent 可以并行思考和执行任务
- 多个 Agent 基于各自的角色可以相互讨论、纠错
复杂的 Agent 产品基本都是多 Agent 架构。
我们学了 LangGraph 的图怎么创建:
- state 用 Annotation 创建,包括 default(默认值)、reducer(值怎么合并)
- 图用 StateGraph 创建,可以添加 node(节点)、edge(边)
- 边可以用 addConditionalEdges 添加路由分支,基于这个也可以实现循环
- 可以用 MemorySaver 等 checkpointer 保存节点的 state,这样就可以恢复上次执行状态了
- 用 interupt 可以做图执行过程的打断,之后再次 invoke 传入 resume Command 即可恢复执行
还学了 prebuilt 的 ToolNode、toolsCondition 以及 createAgent 这些内置的节点、图
学完 LangGraph 的图之后,我们学了多 Agent
多 Agent 一般是 Supervisor - Worker 的架构
直接用 @langchain/langgraph-supervisor 这个包就行,它封装了这套架构。
用 stream 可以看到图执行过程中的 state,分别用 updates、values 可以增量、全量看到节点输出的 state
当然,打印太多的话可以直接用断点调试来看多 Agent 的流转过程。
Supervisor 主管节点只负责任务分发,Worker 来做具体的任务执行。
后面我们的项目实战都是基于这种多 Agent 的架构来写。